“We will be known forever by the tracks we leave”
Dakota
In Native American, Cheveyo means Spirit Warrior.
“To be a spiritual warrior means to develop a special kind of courage, one that is innately intelligent, gentle and fearless. Spiritual warriors can still be frightened, but even so they, are courageous enough to taste suffering, to relate clearly to their fundamental fear and to draw out without evasion the lessons from difficulties.”
Sogyal Rinpoche
| Professional | Expert | Master | |
|---|---|---|---|
| Frog Jumps | 3 sets of 10 | 2 sets of 20 | 1 set of of 50 |
| Bakasana | 5 sets of a 5 second hold | 3 sets of a 30 second hold | 1 set of a 2 minute hold |
| Rolling stretch | 2 sets of 10 reps | 1 set of 30 reps | 1 set of 50 reps |
| Capoeira Kicks | 2 sets of 60 reps | 3 sets of 90 reps | 1 set of 200 reps |
| Knee to Elbow Press | 2 sets of 60 seconds | 2 sets of 90 seconds | 1 set of 100 reps |
| 180º Jump Squats | 3 sets of 14 reps | 3 sets of 28 reps | 2 sets of 50 reps |
| Boxing Combo One | 3 sets of 25 reps | 5 sets of 50 reps | 5 sets of 50 reps |
| Jabs to Spinning Elbow | 2 sets of 15 reps | 2 sets of 30 reps | 2 set of 50 reps |
| One Handed Burpee | 3 sets of 8 reps | 2 sets of 25 reps | 2 sets of 50 reps |
LETS BEGIN
Warm Up
When doing todays warm up I want you to focus internally and connect your mind to the physical movements. Follow the moves with Jen, scan for tight spots and focus your mind on those areas. Let the stresses of your day dissolve and become 100% present within your body. Body-awareness is a fundamental benefit of NUK SOO™ so embrace this feeling and focus as you prepare for the circuit.
REST 15 SECONDS
Frog Jumps
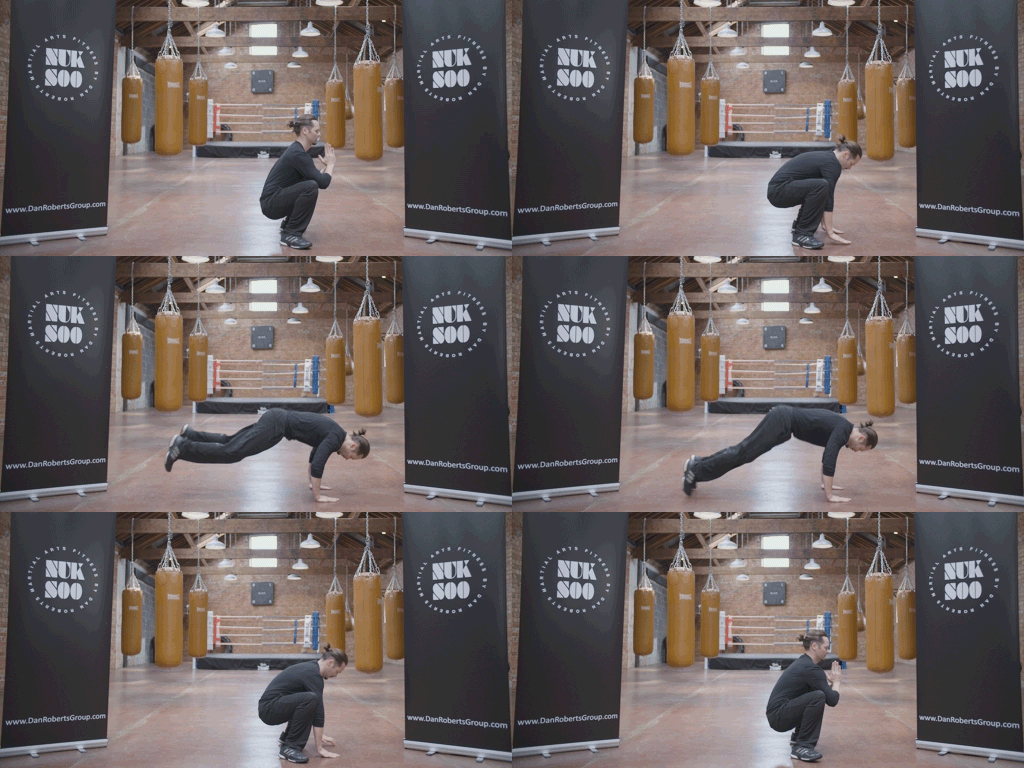
Warrior Benefits: This hybrid cardio, core, power and mobility move will make you a better athlete and better at kicking as you’re developing lower body speed and flexibility around the hip joint. The whole area around your hips and glutes is your bodies engine. I need it to be strong and mobile so you can avoid injury and perform at your peak.
Beauty Benefits: Fat burning and it will slightly tone your abs and legs.
Starting Position: Sit in a deep squat with your heals flat on the floor whilst you maintain an upright stance with your hands closed in prayer position in front of you.
Technique: Place your hands firmly on floor, then jump backwards and fully extend your legs. Hold this front plank position for a second and tense your abs and glutes as you jump back and return to the start position. Aim for fluidity and a constant tempo.
Pro Tip: When doing the deep prayer squat, turn out your feet 45º to make more room for the hips to drop.
Professional: 3 sets of 10 reps
Expert: 2 sets of 20 reps
Master: 1 set of 50 reps
Inter-set rest: 30 seconds
Easier: Hold the squat component for 4 seconds.
Harder: Do one quick and full press up after each jump back when you are in plank position.
REST 45 SECONDS
Bakasana
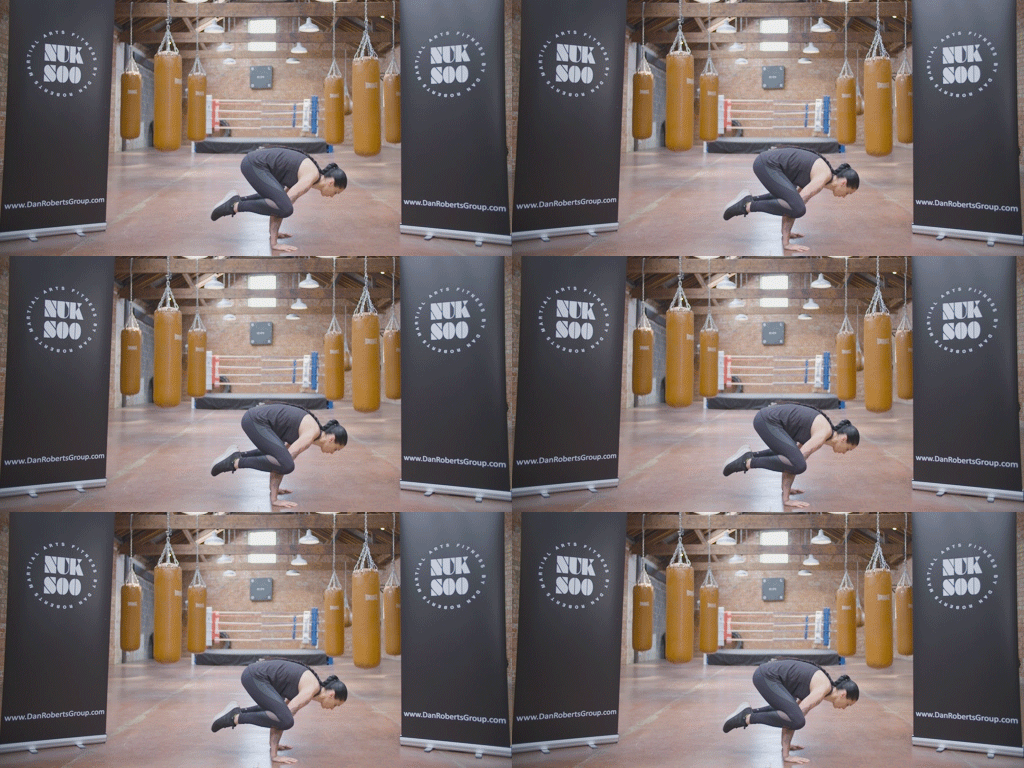
Warrior Benefits: It will strengthen the endurance in your shoulders, hands, abdominals and core, and will greatly develop your static balance together with concentration. If you’re a yoga lover, you will know there are several styles of Bakasanas. From a physiological and psychological standpoint, they all pretty much do the same thing. If you are new to yoga, this is often the first hand balancing pose that is taught and as with all balancing moves, you have to play around with the positioning of the hands and feet to get a real feel for it. This move is also known as the ‘crane pose’ in yoga (baka means crane in Sanskrit) and ‘asana’ means pose or position.
Beauty Benefits: None. Static holds are great for muscular endurance and mental focus, which are key parts of NUK SOO™, but you won’t tone up or lose weight by doing this pose in isolation.
Starting Position: Start in a wide leg deep squat position with your hands on the floor.
Technique: Brace your body, lean forward and gently push your feet off the floor. Your arms should be on the inside of your legs and should stay slightly bent throughout. The Bakasana tests your balance and so it will take a bit of time to get used to it if you are not familiar. Be patient with yourself and you will master it in time.
Pro Tip: When teaching this pose to beginners I find they don’t commit enough to the initial lean when pushing off from the floor. If you can relate, having a pillow in front of you to cushion if you fell, will remove your fear of over-committing and landing on your face! An elimination of fear always allows for quicker learning.
Professional: 5 sets of a 5 second hold
Expert: 3 sets of a 30 second hold
Master: 1 set of a 2 minute hold
Inter-set rest: 20 second break between reps.
Easier: Rather than having your feet in the air, rest them on two yoga blocks or a small step. This will help your body and your mind acclimatise to the correct Bakasana bio-mechanics.
Harder: Rest your knees on the back of your triceps and/or close you eyes.
REST 45 SECONDS
Rolling Stretch
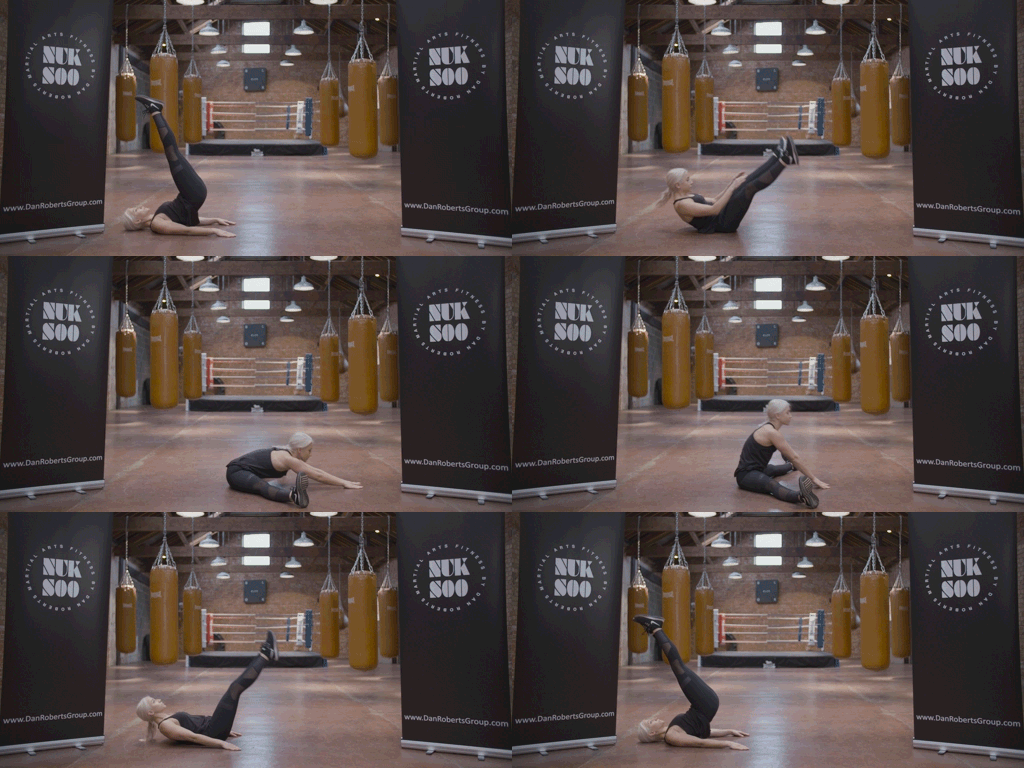
Warrior Benefits: Being supple is important for both injury prevention and athletic prowess. As well as opening up your hips, this dynamic move will stretch your back and hamstrings. In addition, your core and abs will get little workout as you raise your legs in the air.
Beauty Benefits: There is a mild fat burning effect.
Starting Position: Sit on the floor with your legs wide and your arms stretched out in front of you. Try to have your chest as low to the floor as possible.
Technique: Roll backwards, let your arms lie down on the floor and then use the floor to help the natural momentum so your hips come off the floor and your legs lift up into the air. As your legs swing bring them in together and then at highest point, allow your legs to swing down and push your chest to the floor back into start position and repeat.
Pro Tip: Try and get as much height as possible when your legs are in the air. The more speed you get with the backwards roll, the more you will use your natural momentum.
Professional: 2 sets of 10 reps
Expert: 1 set of 30 reps
Master: 1 set of 50 reps
Inter-set rest: 30 seconds
Easier: To make it a slower movement, don’t let your hips come off floor.
Harder: Stretch your legs out as wide as possible in the start and finish position.
REST 45 SECONDS
Capoeira Kicks
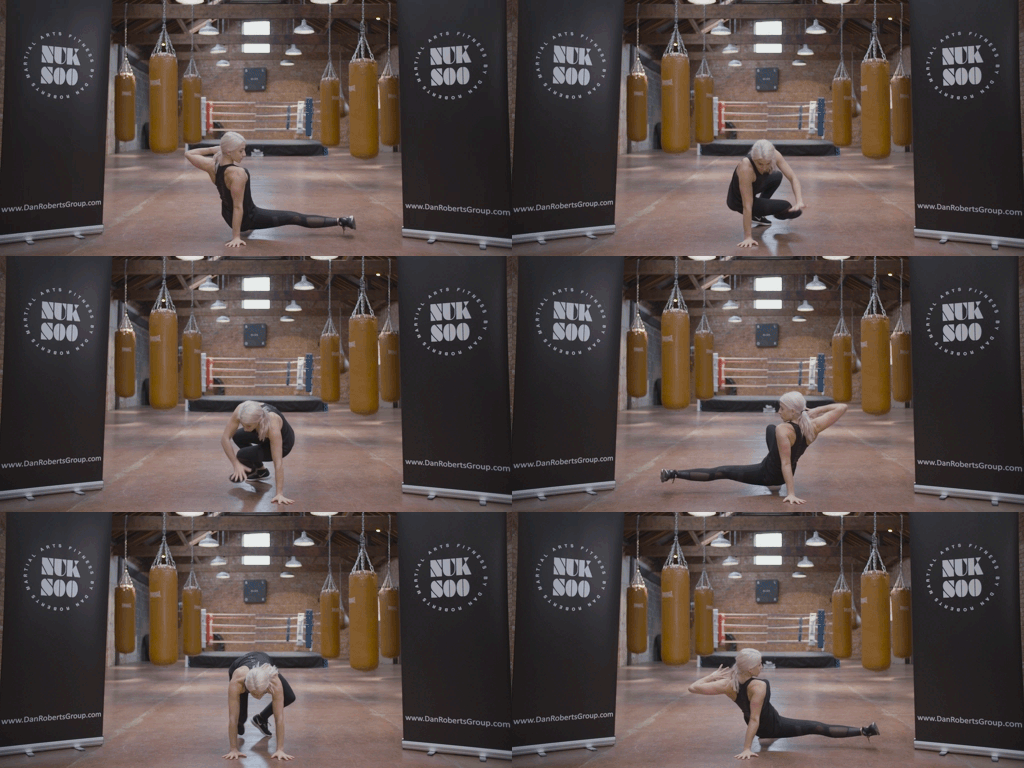
Warrior Benefits: This is low ankle strike taken from this uber-stylish Brazilian martial art which mixes dance with fighting moves. It is a fantastic exercise for core development, shoulder stabiliser strength and hip mobility. As it’s a pretty advanced move, it will also test and develop your gross motor skills and improve co-ordination. You will be doing lots of reps of this bad boy so your cardiovascular system will get a wake up too!
Beauty Benefits: Fat loss and it will tone up your glutes, abs and obliques.
Starting Position: Get on all fours with your hands shoulder width apart and your knees bent so they are directly below your hips. Have a flat back and a relaxed neck.
Technique: This is quite complex to do fluidly, so watch the GIF and video application and read the copy below. Aim to increase fluidity once you have all the components dialed into your muscle memory.
Stage 1 – Lift your left foot off the floor and begin to rotate the right foot by 180º so your heal is facing towards you. Do this whilst lifting your right arm off the floor an into the air.
Stage 2 – Relax your right quad muscle so your hip drops down close to your ankles and then extend the hip and leg out at 90º. It shouldn’t touch the floor but it should stay parallel to it, lifted a couple of inches at all times.
Stage 3 – Return to the start position and place your hand back on floor and then repeat on the other side.
Pro Tip: The back foot rotating is the key to mastering this move. This move will only look and feel great once all the elements are solid and the body is moving as one complete unit. When learning, it’s sometimes useful to do the elements totally incorrect on purpose to highlight the importance of the technique.
Professional: 2 sets of 60 reps
Expert: 3 sets of 90 reps
Master: 1 set of 200 reps
Inter-set rest: 90 seconds
Easier: Eliminate the kick at the end and just dangle the foot off floor instead.
Harder: Do each rep in slow motion, so you will be spending 8 seconds per rep. If you’re sucker for punishment, you’ll love it!
REST 45 SECONDS
Knee to Elbow Press
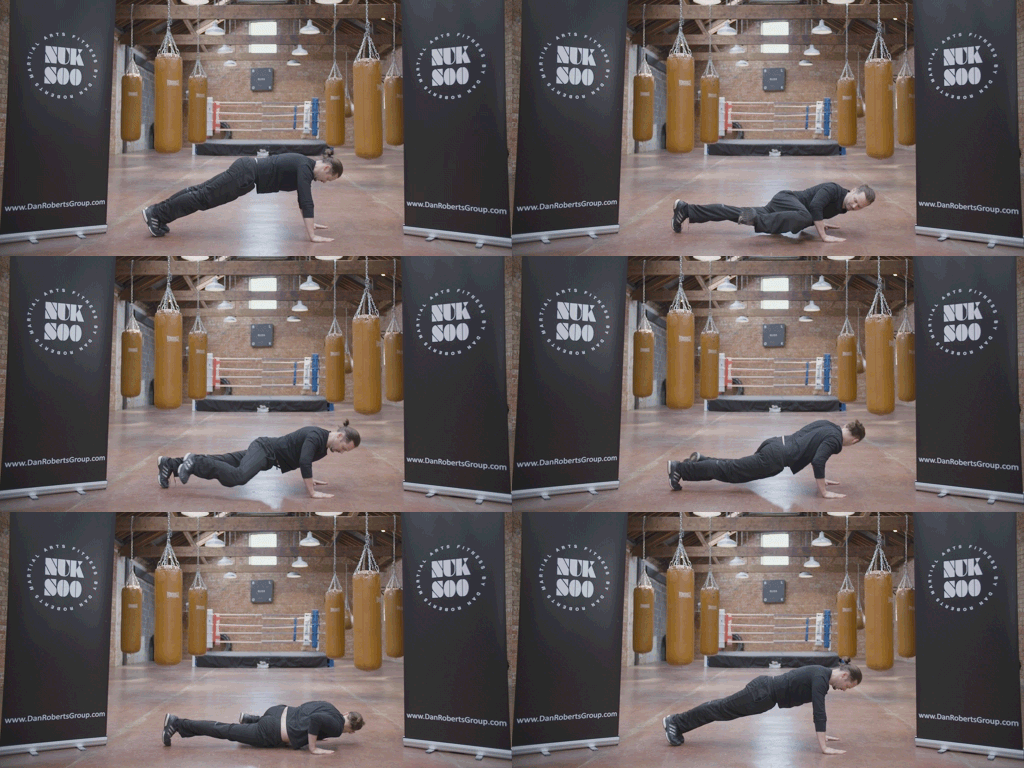
Warrior Benefits: This will build upper body strength and muscular endurance. You will be directly improving your ‘pushing’ muscles which are the pectoral major, anterior deltoids and triceps. As with all push ups, your abs will get a little workout as well, and the rotation will really stress out (in a good way) your internal and external obliques and the entire core musculature. Your triceps will be working unilaterally (one at time) which will be tough, but it will even out any imbalances and help your punching and throwing skills. For beginners, this move will also develop co-ordination and balance.
Beauty Benefits: So many! You will burn fat and build tone in your upper body and abdominal region. As the obliques are working hard you will also aid the development of vertical lines. In my private coaching in London, when I work with Hollywood actors and Victoria Secret models, getting these lines popping out tend to be a priority. You will only see this definition when your body fat is low enough though. Vanity aside this is kick-ass move.
Starting Position: Start in a press up position with your hands under the shoulders and your feet hip width apart.
Technique: Shift your weight onto your left arm and lift your right foot off floor. As your chest lowers down to your left side, draw your right knee towards your right forearm. Tap it and then go back to start position and repeat on other side.
Pro Tip: Rotate your head to the side that your knee and elbow meet – this will make it more fluid. Imagine yourself as a panther and flow into each rep.
Professional: 2 sets of 60 seconds
Master: 2 sets of 90 seconds
Expert:1 set of 100 reps
Inter-set rest: 90 seconds
Easier: Do it on an incline with your hands up on a bench or step.
Harder: Do it on a decline with your feet up on a bench or step.
Want it even harder? I worked with a professional cage fighter and made him do this on a decline together with a handclap between each rep which helped develop power-endurance. Try it, but just have pillow on floor under your face, as I don’t want you breaking your nose if you don’t quite make it!
REST 45 SECONDS
180º Jump Squats
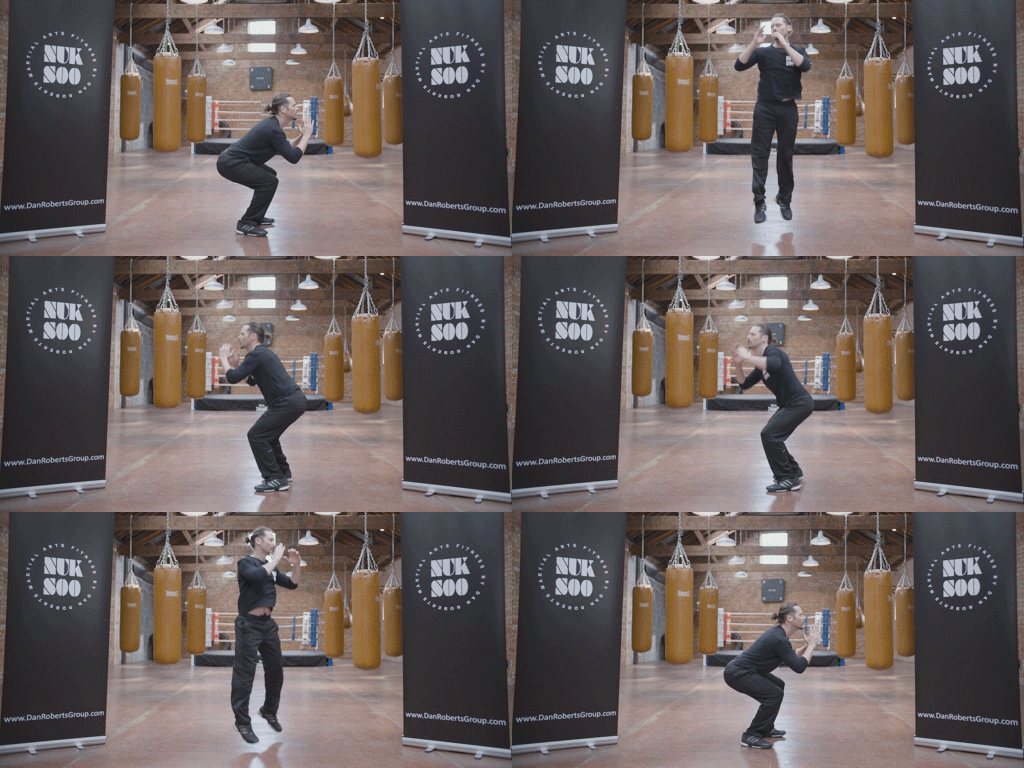
Warrior Benefits: This will develop lower body power. In addition, co-ordination, kinesthetic awareness, dynamic balance and eye-foot coordination will also be directly challenged and will improve on every rep. It will also look to improve bone health as the impact will increase bone mineral density which is of particular importance to females over 40 and men over 50.
Beauty Benefits: Mild fat burning and very mild glutes, legs and abdominal toning.
Starting Position: Stand up straight, bend your knees and drop down few inches to the start of squat. Tilt your hips back and keep your chest up, just like you would if you had barbell across your shoulders.
Technique: Bend your knees a bit more, swing your arms back and jump up. Spin 180º and land. As you land cushion the landing by bending your knees and then repeat. Maintain an upright head posture throughout.
Pro Tip: Turn your music down and listen to the landing. If it’s noisy then you are being inefficient and putting stress on your knee and hip joints which we want to avoid. Just like running, try and land as quietly as possible. Imagine you are a spring and cushion your landing by landing on the balls of your feet and bending your knees to absorb the energy.
Professional: 3 sets of 14 reps
Expert: 3 sets of 28 reps
Master: 2 sets of 50 reps
Inter-set set rest: 45 seconds
Easier: After landing each 180º jump, pause for 3 seconds.
Harder: Land into deep squat every 2nd jump.
REST 45 SECONDS
Boxing Combo One
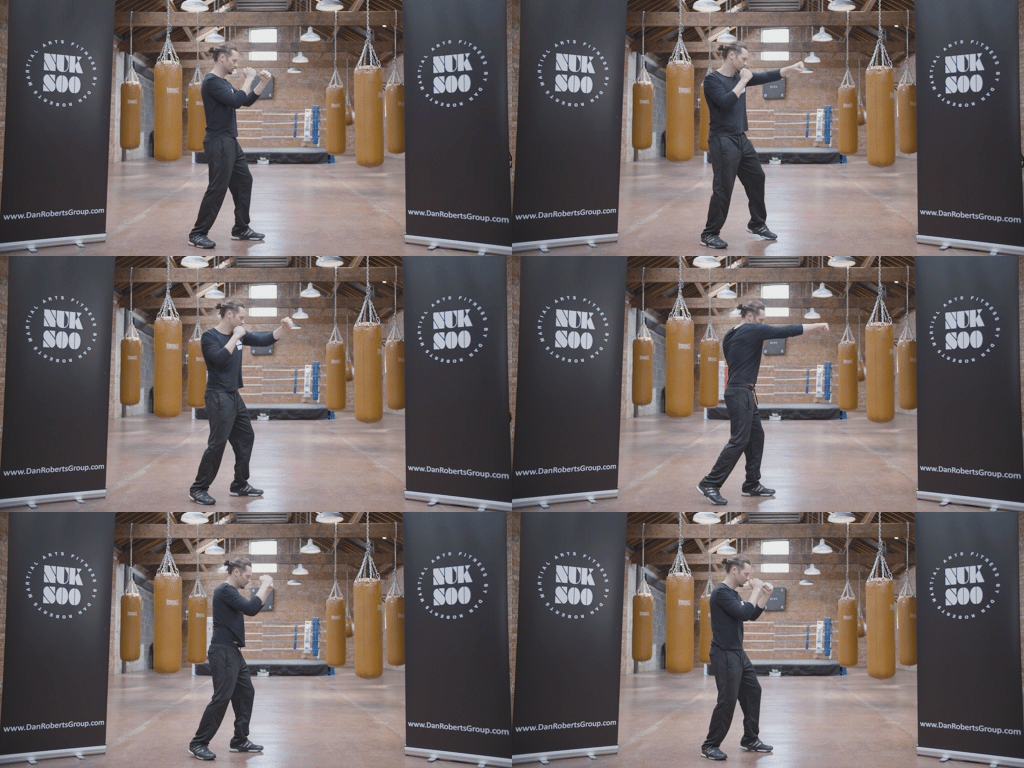
Warrior Benefits: Learning the basics of boxing is the first step in learning the art of combat. Once you can punch it’s easier to learn how to use the elbow and eventually weapons. Power comes from having a good base (footwork) and rotation (ability to twist through the spine into a punch). This basic shadow boxing drill will remind you how to rotate, extend arms and also how to stay focused. The simple truth is, the more punches you do, the better you will get at them!
Beauty Benefits: Fat burning.
Starting Position: Stand in a ‘boxing ready position’ with the left foot forward and the right foot back.
Technique: There are two punches in this combination. The first is a left jab – screw your left foot into the floor and rotate the left side of the body forward and extend the arm. Breathe out through your nose as your fist fully extends forward. When your fist is 80-90% of its maximal distance away from you, focus on your right side and drive left heal into the floor (to anchor you) and screw the right foot into the floor and rotate the hips and shoulders, and fully extend your right hand. Again, breathe out sharply through your nose as you ‘throw’ the right hand. This punch is known as a right cross or straight. These two punches done back to back are often referred to as the 1-2 combination. Pause for a second after each combination and just repeat!
Pro Tip: Imagine a ping pong ball 2 feet in front of your nose. Every time you punch, imagine hitting through this ping pong ball.
Professional: 3 sets of 25 reps
Expert: 5 sets of 50 reps
Master: 5 sets of 50 reps
Inter-set rest: 30 seconds
Easier: Do it in slow motion.
Harder: Step in leading with your left foot at the start of each combination and then step back.
To see how to use this in a combat situation see the application video below.
REST 45 SECONDS
Jabs to Spinning Elbow
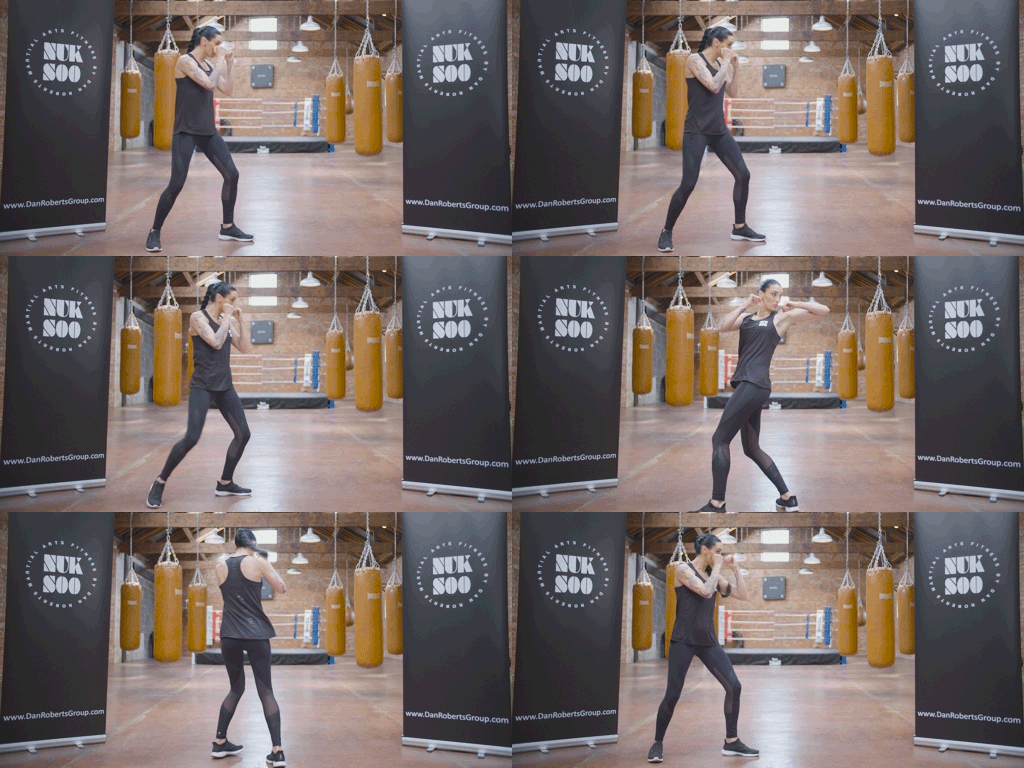
Warrior Benefits: This is a Muay Thai Boran move but several martial arts have very similar versions where the elbow is used. It is showcased for example by Christian Bale in Batman and by Tom Cruise in the Jack Reacher movie as the Keysi Fighting Method. Aside from learning a funky fighting move, you will develop your overall coordination, balance and improve both trunk rotator/anti-rotators muscles.
Beauty Benefits: Fat burning.
Starting Position: Stand like a boxer, with your left foot forward and your right foot back – hip width apart. Bring your hands up to protect your face, with your left hand slightly edging more in front.
Technique: Stage One – Throw two left jabs by twice extending the hip, shoulder and arm towards an imaginary opponent in front of your nose. Keep your hands and body relaxed until you extend the arm, then tense your fist.
Stage Two – Take a stride forward with your right foot and then let the left foot step across to the side. As you are doing this lift your elbow up, (you body will be naturally rotating). Help this rotation by turning your back 180º to face where you just jabbed and then finally point the elbow to the same place. Spin back and repeat on same side. For the second set please swap sides so you jab and elbow with the right hand and begin with the right foot forward and the left foot back.
Pro Tip: Imagine aiming for a table-tennis ball for all 3 strikes. Accuracy in a real fight is more important than power and as you are developing warrior attributes, precision in mind and body can only be developed through conscious practice and getting all the details right.
Professional: 2 sets of 15 reps
Expert: 2 sets of 30 reps
Master: 2 sets of 50 reps
Inter-set rest: 30 seconds
Easier: Do it in slow motion, so it will be 6 seconds per rep.
Harder: Drop to the floor and add in 1 squat thrust after every 3 reps.
REST 45 SECONDS
One Handed Burpee
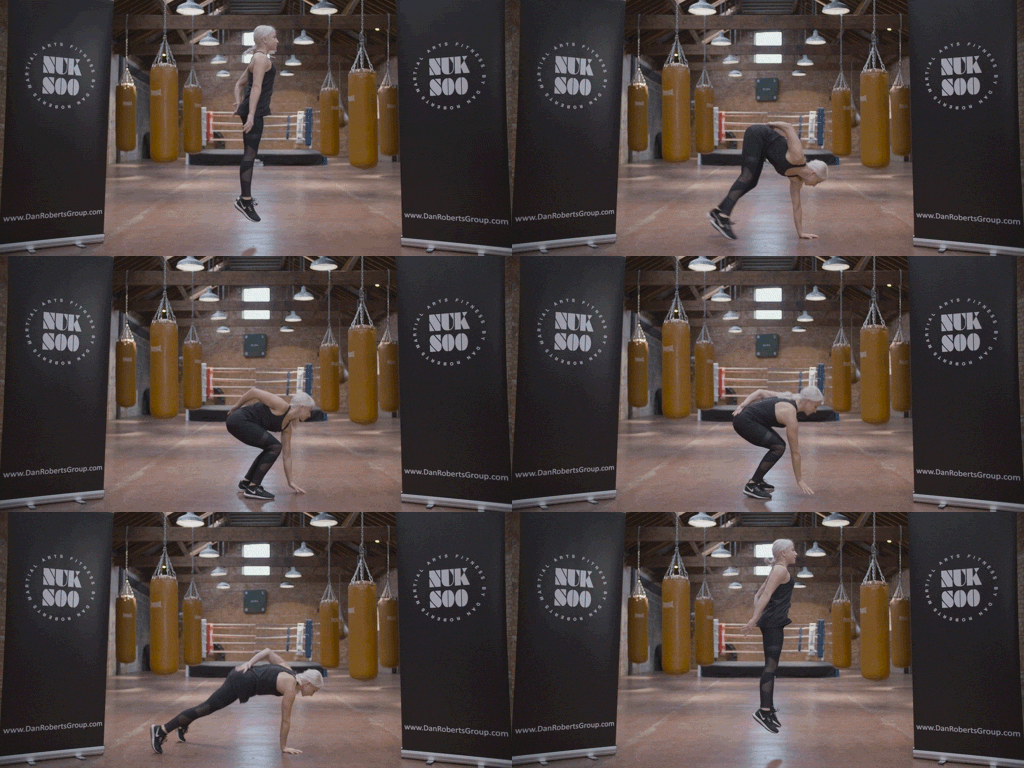
Warrior Benefits: Abs, core and cardiovascular output will all improve and you will develop your lower body power and general endurance. The shoulder and glutes will also get a smaller workout, but by the time you do this move, they (along with all your other muscles) will be fatigued from the other exercises, so this will very much be a total body workout. Exercises in NUK SOO™ are in a specific order for physiological and psychological reasons. This is hard drill and I know you are tired but stick with it, this is where exercising can become character building. Just like a muscle, when you dig deep and push on through, your mental toughness will improve every time you test it. This is a fundamental concept of your NUK SOO™ experience, so I am expecting big effort from you today.
Beauty Benefits: This is great for fat loss and the toning of your abs. You will also tone the arms and glutes a little bit too.
Starting Position: Begin in a half squat position with your left palm touching the floor and your right hand behind your back.
Technique: Jump your feet backwards so your are in a press up position, then jump forwards so your feet land back in the same position and then jump in the air. As you jump swap your hands around so your left hand is behind your back and your right hand is by your side ready to support you as you land. When you land, bend your knees and repeat the exercise with the opposing hand. Keep on alternating sides and try and get into rhythm just like the GIF.
Pro Tip: To maximise your cardio benefits don’t be lazy on your jumps. Really kick back when horizontal to get into that plank and when doing the vertical jump, go for as much height as you can. The more you push the bigger the sense of accomplishment you will get.
Professional: 3 sets of 8 reps
Expert: 2 sets of 25 reps
Master: 2 sets of 50 reps
Inter-set rest: 30 seconds
Easier: Loose the jump and stand.
Harder: Hold the one-handed press up position for 3 seconds on every rep.
REST 30 SECONDS
Cool Down
Follow along and enjoy this time to stretch and loosen up any tight muscles. The moves in NUK SOO™ are done mindfully with control, so chances of injury are small, however tightness can creep up on you and tightness can cause an over compensatory effect from other muscles. This often increases over time, so if anything feels particularly tight, feel free to just stop the video and hold that stretch for 30-90 seconds longer.


