
“The mind acts like an enemy for those that do not control it.”
Bhagavad Gita
Durga is a well known Goddess in Hindu mythology, and as such, there is an annual festival called Durga Puja in Northern India dedicated to her honour. Her name means the invincible, unconquerable and unassailable one. She was a wise warrior, often depicted riding a lion with eight arms, each holding a different weapon from the gods (pretty badass!). She is immortalised in the Hindu religious text ‘Devi Mahatmya’ which tells stories of moral lessons which feature her as she stops the many demons that are causing violence and destruction. The demons represent the afflicted ego-centric qualities in humans such as arrogance, pride, hypocrisy, greed, rage, discrimination, injustice and more.
The mythology of Durga is a poetic reminder that the biggest demons are in-fact our own. To be a warrior you must overcome adversity – both externally and internally. Please spend five minutes thinking about this after your workout today.
| Professional | Expert | Master | |
|---|---|---|---|
| Deep Squat Rotations | 1 minute | 2 minutes | 3 minutes |
| BJJ Hip Thrust | 1 set of 40 | 2 sets of 40 | 1 set of 80 |
| Muay Thai Lunges | 2 sets of 25 | 3 sets of 20 | 4 set of 25 |
| Rolling Pistols | 2 sets of 20 on each leg | 3 sets of 20 on each leg | 3 sets of 30 on each leg |
| Air Running | 2 sets of 2 minutes | 2 sets of 4 minutes | 1 set of 10 minutes |
| Alternating Knee Strikes | 2 sets of 60 seconds | 2 sets of 2 minutes | 2 sets of 3 minutes |
| Boran Grab & Chop | 2 sets of 30 reps | 2 sets of 50 reps | 2 sets of 100 reps |
| Krav Maga Elbows | 1 set of 40 | 2 sets of 40 | 1 set of 100 |
| Plyo Presses | 3 sets of 15 reps | 3 sets of 25 reps | 2 sets of 50 reps |
LETS GET GOING!
Warm Up
Follow Jen and move with her as she flows into each warm up sequence. If you work at a desk all day or have slept badly you may have tension in your neck and back and not even realize it so we don’t want to find this out while working out at full blast. If you do feel tight, then stretching helps. Just being aware of your tight bits while your are working your way through NUK SOO™ is a vital aspect of injury prevention.
REST 15 SECONDS
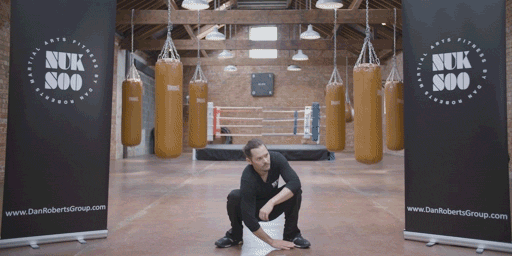
Deep Squat Rotations
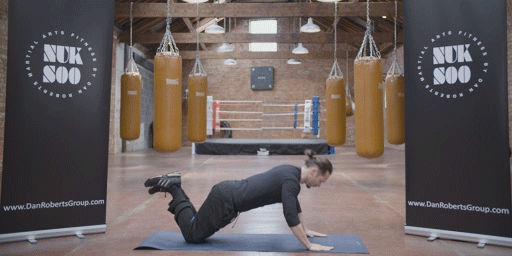
Warrior Benefits: This move helps to open out your hips and loosen your spine. I use it both as a warm up and as an exercise when working with pro fighters as it’s just so brilliant and effective. Doing NUK SOO™ will also help you become an all-round athlete, which will help you be able to kick, jump and sprint without injury. If your hips and spine are tight, injuries may be more frequent and your options limited. This drill is one of many antidotes you will learn to help you keep your body supple, young and capable.
Beauty benefits: None
Starting Position: Sit down into a squat with your feet flat on the floor and your head up.
Technique: While maintaining this position place your left palm on the floor between your feet and reach up to the sky with your right hand. Feel the rotation and don’t allow your heals to come off the floor. Return to the start position and repeat it on the other side. Copy my tempo and just follow the GIF. Every time try to reach a little higher as you maintain a solid stance.
Pro Tip: Don’t let your upper body curve over, so do this with a mirror to one side, and check form as you reach up. A tired mind or tired body will adversely affect form. Correct form on this drill is of particular importance to posture, so please be strict and modify if it feels too hard or easy.
Professional: Do for 1 minute
Expert: Do for 2 minutes
Master: Do for 3 minutes
Easier: Sit on 2 yoga blocks or a very low stool.
Harder: Go into a full deep squat with your glutes grazing the floor.
REST 45 SECONDS
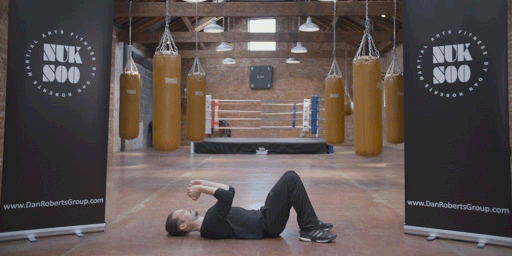
BJJ Hip Thrust
Warrior Benefits: This move makes you a better athlete as it helps to teach your core, glutes, hips and lower back to work how they are designed to – in sequence with one and other. When you jump, run and kick these muscles (known collectively as your posterior chain), they should always work together! Unfortunately, modern day living means there is often a bit of a disconnect.
Beauty Benefits: Brazilian Jiu Jitsu (BJJ) Hip Thrusts warm up and ‘activate’ the posterior chain, thus they indirectly help to tone and firm the glutes and the back of the legs. In time, with this exercise you will achieve a more lifted butt and a stronger core.
Also, as you will see in the bonus video, the typical floor hip thrust is very similar to a mount scape move from the world of Brazilian Jiu Jitsu (BJJ).
Starting Position: Lie on your back and slide your feet towards you, so your knees are up. Bring your arms up as if to protect your face like a boxer, with your elbows pointing down towards your hips.
Technique: Drive your heels into the floor as your push your hips upwards. Hold for a second at the top, making sure you are not hyperextending your back. Tense the glutes and abs and then lower yourself to floor and repeat. Breathe out as you extend and breathe in when you return back to the start position.
Pro Tip: Driving your heals into the floor as you thrust up helps fully activate your posterior chain. As an experiment, try driving your toes into the floor and you will feel the quads (front of legs) working more instead. This isn’t dangerous, it just means you’re missing out on the full potential of the exercise! Western life makes our quads dominant so this exercise is designed to be a solution to years of sitting down by ‘evening your body out’, so the details matter!
Professional: 1 set of 40
Expert: 2 sets of 40
Master: 1 set of 80
Inter-set rest: 30 seconds
Easier: Slow down the hip thrusting movement to 50% of the normal speed.
Harder: Add in a resistance band to just above your knees. As you do the movement slightly push out against the resistance. This will engage your glute medius more and make each rep harder.
REST 45 SECONDS
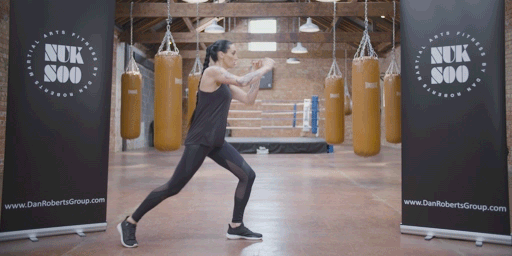
Mauy Thai Lunges
Warrior Benefits: You will build up strength and endurance in your legs without bulking. Your core and supportive muscles such as your lower back and abs will also get a workout as having your arms in the air makes you less balanced. Another benefit of holding your arms in the air in this traditional Muay Thai fighting stance, is that your ankle and knee stabilisers will work harder and you will develop lactic acid tolerance (muscular endurance) in your shoulders.
Beauty Benefits: This drill will tone and define the front and back of your legs, firm your glutes and help you burn fat.
Starting Position: Standing with your feet hip width apart and your hands up higher than your head.
Technique: Step forward with your left leg and then sink down into a lunge, maintain an upright back, engage your core with good posture with your hands in the same stance. Step back and repeat on other side.
Pro Tip: Breathe out through your mouth while you focus on the back leg, squeezing your glutes and bending as you sink down into the lunge. This will help eliminate the most common mistake of a lunge movement pattern, which is over-use of the quads. If you don’t feel anything in your hamstrings or glutes and just feel all the burn in your quads, then film yourself sideways and assess your form.
Professional: 2 sets of 25
Master: 3 sets of 20
Expert: 4 set of 25
Inter-set rest 30 seconds
Easier: Stretch your arms out wide like your are walking a tightrope.
Harder: Close your eyes.
REST 45 SECONDS
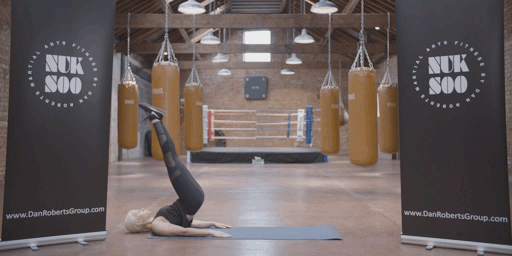
Rolling Pistols
Warrior Benefits: My work with athletes, dancers and stuntmen (not just fighters), has taught me the importance of moving in new ways. Adapted from the standard pistol squat, Rolling Pistols are harder than they seem and will challenge a different kind of movement. As well as developing advanced athleticism this move teaches you timing, body acceleration, control, balance and develops lower body and core strength. Only when the mind and body work together will you master this so to perfect this move you will need to control your mind (patience and concentration) and your body.
Beauty Benefits: As you perfect it, glutes, legs and abs will develop a little bit more tone.
Starting Position: Lie on your back with your arms resting outstretched by your side, palms down.
Technique: Raise your legs and swing them up above your head. The higher you go the more momentum you will get as they swing down to help propel you. As your body rolls back down, place one foot forward so it finishes into the desired low lunge stance shown in the GIF. Your arms will naturally reach forward to help you balance. Allow them to do this and grasp your hands at end. Immediately roll back and repeat. Make sure you alternate the legs with the sets. If there are three sets then just split the last set into two to even it out.
Pro Tip. Experiment with different stride lengths. We all have different limb lengths and this has a subtle yet real effect on the optimal biomechanics for any movement, be it running, lifting or pistol rolling!
Professional: 2 sets of 20 on each leg
Expert: 3 sets of 20 on each leg
Master: 3 sets of 30 on each leg
Inter-set rest: 30 seconds
Easier: Use your hands to push off the floor to help propel you forward.
Harder: Go into a standing lunge position at the end of each rep.
REST 45 SECONDS
Air Running
Warrior Benefits: Your lung capacity will improve. A good cardiovascular base makes life, competition and movement easier and more fun. Also, the impact is great for lower body bone health.
Beauty Benefits: Burning that fat!
Starting Position: Stand up, shoulders back with your head up.
Technique: Quite simply, jogging on the spot. Use your arms to help gain momentum. Drive your knees up to waist level and maintain evenly paced breathing.
Pro Tip: It’s easy to get lazy during this move. Keep the knees up high each time and push through the (minor) pain barrier.
Professional: 2 sets of 2 minutes
Expert: 2 sets of 4 minutes
Master: 1 set of 10 minutes
Inter-set rest: 30 seconds
Easier: Smaller steps with the feet low off the ground.
Harder: Put your arms in the air and keep them up above your head. Aside from making the movement less fluid, this will build lactic acid in your arms. This makes it super tough for the mind and body.
REST 45 SECONDS
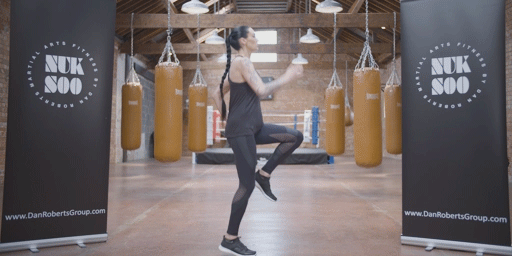
Alternating Knee Strikes
Warrior Benefits: One of my all time favourite drills, this a conditioning exercise my ‘Kru’ (Thai boxing coach) in Thailand gave me to build my muscle memory and improve my knee strike technique, fight conditioning and foot speed. For you it will do exactly the same. Very similar to the relentless knee strikes, however this requires a bit more balance and co-ordination.
Beauty Benefits: You will burn a lot of fat and tone and firm your glutes.
Starting Position: Begin in split stance position (which means the left foot forward, right foot back), with your feet about 6-8 inches apart. Bring your hands up to a boxing stance protecting your jaw. Even though you are not in a real combat situation, imagining a real opponent in front of you is an important habit to get into when doing any kind of shadow boxing – it sharpens the mind.
Technique: You must always strike from the back leg. When you land back after the first strike, jump up and swap your foot position so the other leg is back. As soon as it lands on the floor drive the hip and knee foward at 45º. Aim for torso height and as you drive your knee forward, tilt your upper body backwards like pendulum. Dee seen here in the in the GIF and Video Application is fighter so her form is good to copy. No rests with this one, whatever level you are doing in NUK SOO™ this move is to be done in one continuous flow.
Pro Tip: When jumping, try the back foot landing on the ball of the foot and not the heal. This will allow for more spring when you strike.
Professional: 2 sets of 60 seconds
Master: 2 sets 2 minutes
Expert: 2 set of 3 minutes
Inter-set rest: 30 seconds
Easier: Step into the position rather than jumping.
Harder: Aim for chest height. The best way of doing this is to allow the back heal to come 2 inches off floor as you strike. This is a better technique for fighting because it challenges and improves your balance.
REST 45 SECONDS
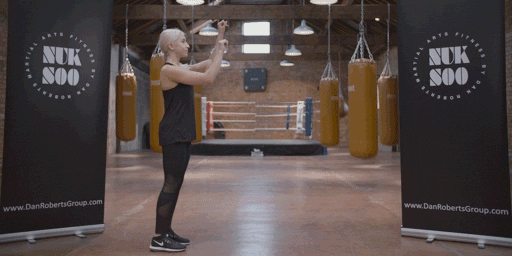
Boran Grab & Chop
Warrior Benefits. Aside from combat, this move is great for co-ordination and shoulder mobility. Muay Thai Boran is the traditional version of Muay Thai (Boran means ancient, and Muay means boxing). I studied it while I was living in Thailand and its lot more stylish and in many ways, more violet than Muay Thai. Muay Thai is a sport now, but the ‘Boran style’ was used by military in hand to hand combat, so many of the strikes you learn are designed to maximise damage. The application video will showcase some practical street fighting and self-defence ways this move can be used.
Beauty benefits: None
Starting Position: Begin by simply standing with your feet hip width apart and your hands up in front of your face.
Technique: Step forward with your left leg while swinging your arm (like a boxing left hook). Then as you land your step, reach up with your right hand in a circular motion and then drive down. If you have ever thrown a cricket ball or served in tennis, it’s a similar feeling. Then step back and repeat on the other side.
Pro Tip: Breathe out when the elbow comes down which will help regulate your oxygen intake. When doing complex movements we often hold our breathe. When you do any striking moves in NUK SOO™, please always try to breathe out during the strike and breathe in as you return to your start position.
Professional: 2 sets of 30 reps
Expert: 2 sets of 50 reps
Master: 1 set of 100 reps
Inter-set rest: 30 seconds
Easier: Do it slow motion.
Harder: Add in a squat after each rep. This will make it more of a fat burning and conditioning exercise and make your central nervous system adapt to performing strikes when tired.
REST 45 SECONDS
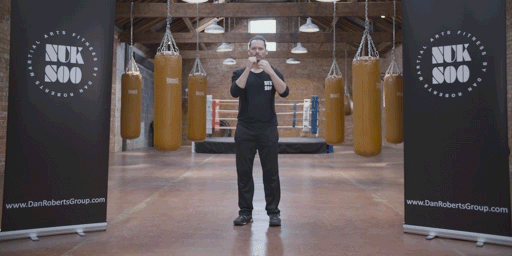
Krav Maga Elbow Strikes
Warrior Benefits: Krav Maga is a highly practical collection of combat skills designed by and used by the Israeli special forces. While this doesn’t have the deep philosophical heritage as some of the more traditional eastern martial arts, it is arguably more effective in a one-to-one street fighting situation. It’s great for shoulder mobility which is of particular importance if you spend your days on front of a computer.
It has 3 elements which make it a fast, aggressive and effective striking move:
1. You step in towards your target
2. You protect your face while attacking
3. You aim for a precise target. For example, an elbow strike should aim to the temple, or nose.
Beauty Benefits: Once you’ve mastered form and you are moving at speed, this drill becomes a type of cardio interval training which is good for general fat burning.
Starting Position: Stand up straight, with your feet hip width apart and your hands up high protecting your face.
Technique: Take a small step forward with your right foot and draw your right elbow back (like bowling cricket ball) and slash down diagonally. Step back and then repeat on the left side and keep alternating sides. The arm not striking should protect your face. Look at the GIF and see how she protects herself. If you can’t see it, neither can her opponent. Please see the fight application video below for further exploration of this concept.
Pro Tip: If your shoulders are tight, you will find it hard to get a good range of movement so be patient and your body will adapt. To help with range of movement and to improve this move, do this and other shoulder opening moves within your warm up. My challenge for you is to try to get a bigger range of movement every time you do this drill.
Professional: 1 set of 40
Expert: 2 sets of 40
Master: 1 set of 100
Inter-set rest: 30 seconds
Easier: Eliminate the step and defence hand position putting all your focus on the attacking arm movement.
Harder: Take a larger more powerful step forward and attack at maximum speed. Slowly step back and repeat.
REST 45 SECONDS
Plyo Presses
Warrior Benefits: You will develop stronger wrists, pectoral major, triceps and anterior deltoid (front of shoulder) strength and increase your general ‘pushing power’. From throwing or hitting a ball further, to throwing a punch quicker, the more ‘pushing’ power you have, the more useful, athletic and badass your body will be.
Beauty Benefits: You will burn fat and achieve greater definition around the pecs, back of the arms and shoulders. Also as your abs work hard, in time (if your body fat is low enough), you will see increased firmness.
Starting Position: Begin in a press up position on your knees.
Technique: Lower your chest to the floor, then push up quickly and clap your hands before landing back in the start position. Always breathe out on every push-up/clap. Keep the abs tense to keep upper body flat, thus maintaining good form.
Pro Tip: The human body is very intelligent as it has ways to reduce pain and reserve energy, so as you get tired the arms will want to flap out wide so the pecs can help. The more your elbows are tucked in, the more your arms and shoulders will take over from the pecs. As the pecs are relatively big muscles, this makes the movement feel harder and will make your triceps and shoulders develop quicker. Be aware of this and decide whether you are going to give in to what your body thinks is best, or push through (being careful to maintain strict form).
Professional: 3 sets of 15 reps
Expert: 3 sets of 25 reps
Master: 2 sets of 50 reps
Inter-set rest: 30 seconds
Easier: Place your hands on a bench or secure surface.
Harder: Have your knees off the floor at all times. This will add considerable weight to each repetition and make it a lot harder on all the muscles, particularly the abs and core.
REST 30 SECONDS
Cool Down
The mental side of cooling off is often neglected. Follow the moves in the video and remember now is an opportunity to show your body a bit of love after a hard workout. After you finish today’s stretch, just lie on your back with your eyes shut for few minutes and focus on your breathing. A little sneaky me time is always time well spent to center yourself before going about your day.