Warrior Challenge: Day Three
![]() “A warrior takes responsibility for his acts, for the most trivial of acts. An average man acts out his thoughts, and never takes responsibility for what he does.”
“A warrior takes responsibility for his acts, for the most trivial of acts. An average man acts out his thoughts, and never takes responsibility for what he does.”
Carlos Castaneda
![]()
Welcome to Day 3 of this little challenge. ‘Warriors’, be they from literature, history or the movies are always defined by overcoming adversity. Their sheer will and determination is their fuel and their ‘never give up’ attitude is what makes us love and admire them. Today you are going to treat each exercise as a rite of passage. You will focus, give it your all and do yourself proud. Acting as the lead character in your own adventure story is a useful mindset to adopt, particularly if you are feeling tired or de-motivated.
Among other exciting moves, this circuit includes a highly effective close-range elbow strike and four kicks taken from four varying martial arts. Make sure you have enough space to move, no injuries or accidentally kicking passing people, please!
| Professional | Expert | Master | |
|---|---|---|---|
| Jumping Hand Slams | 4 sets of 20 reps | 1 sets of 75 reps | 1 sets of 100 reps |
| Press to Planks | 3 sets of 60 seconds | 1 set of 50 reps | 2 sets of 50 reps |
| One Handed Burpees | 3 sets of 10 reps | 3 sets of 20 reps | 3 sets of 30 reps |
| A-Frame Walks | 2 sets of 60 seconds | 2 sets of 2 minutes | 3 sets of 2 minutes |
| Alternating Thigh Teeps | 2 sets of 30 reps | 2 sets of 40 reps | 3 set of 50 reps |
| Kempo Floor Kicks | 1 set of 40 reps | 1 set of 60 reps | 1 set of 100 reps |
| Alternating Front Elbows | 1 set of 90 seconds | 1 set of 2 minutes | 1 set of 3 minutes |
| Capoeira Kicks | 4 sets of 10 reps | 4 sets of 20 reps | 3 set of 40 reps |
| Scissor Kicks | 3 sets of 60 seconds | 3 sets of 90 seconds | 3 sets of 2 minutes |
LETS GET STARTED!
Warm Up
As always follow the warm up, scan for tight muscles and focus the mind ready for your workout today.
REST 15 SECONDS
Jumping Hand Slams
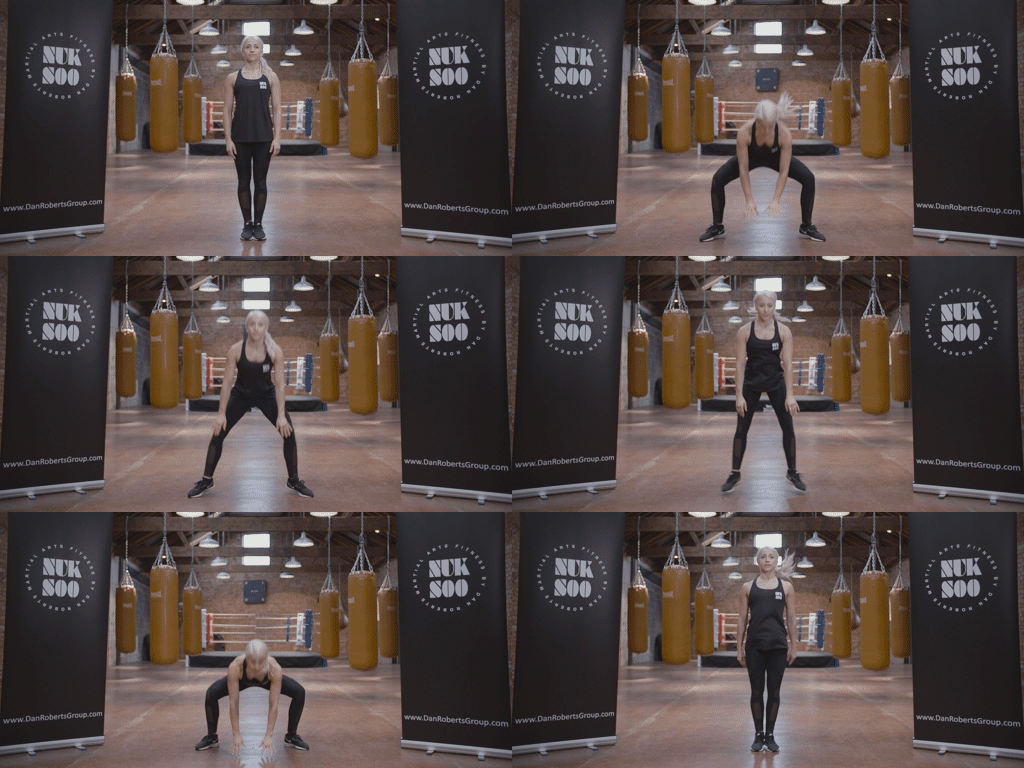
Warrior Benefits: It will build endurance by improving your cardiovascular system which will in turn make your heart and lungs stronger. As with all controlled stress on the body, you will adapt. Your legs and lower back will be become more resilient and if you push through the drill and you don’t give up, your mind will also develop reliance.
Beauty Benefits: You will burn excess fat.
Starting Position: Stand up straight with your feet shoulder width apart. Put your hands out in front of you and soften your knees.
Technique: Jump your feet out wide and bend over from the waist and slap the floor with your palms. As you come back up, jump your feet to the start position and repeat. Always breathe out as you slam the floor as it helps you get into a nice steady rhythm.
Pro Tip: There is always a trade-off between legs and back with this move. If your lower back hurts then do it more like a squat. The most important element of the drill is the cardiovascular effect, so I would rather you adapted the move slightly to keep your heart pumping fast.
Professional: 4 sets of 20 reps
Expert: 1 sets of 75 reps
Master: 1 set of 100 reps
Inter-set rest: 30 to 60 seconds
Easier: To lessen the squat, slam higher than the floor – use pillows or a 6 inch step or block.
Harder: Hold your breath for every 15 slams. This will help to develop your anaerobic system.
REST 45 SECONDS
Press to Planks
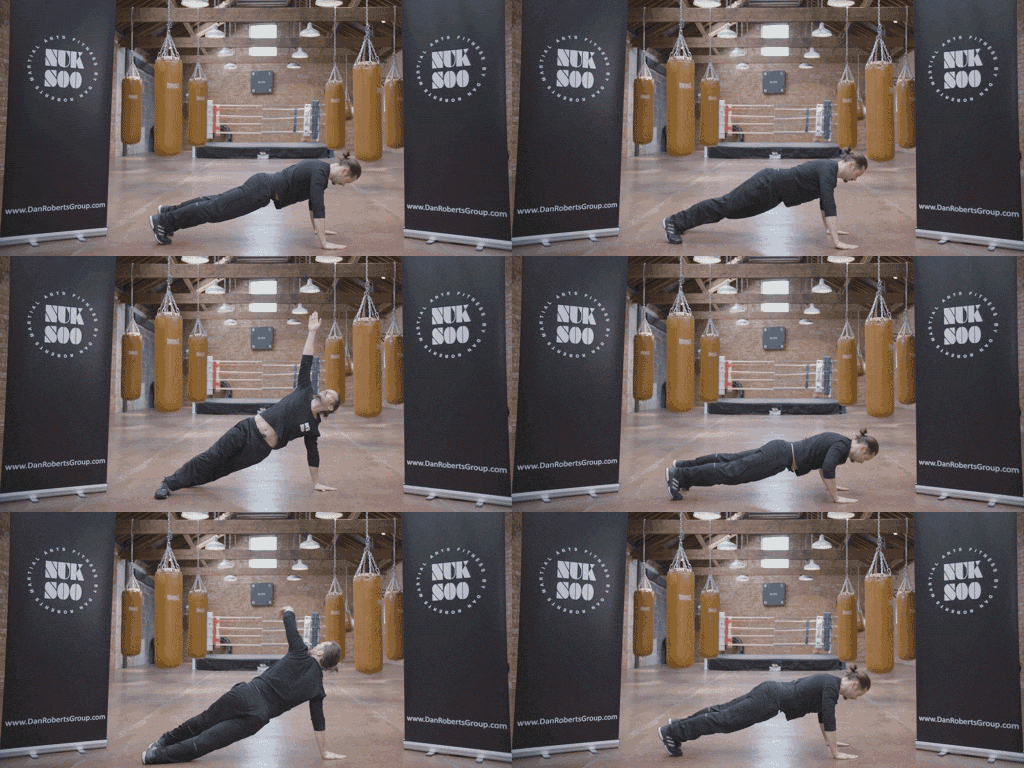
Warrior Benefits: This is an upper body and core strength exercise. The press up component develops your triceps, anterior deltoid (front part of shoulders), and pectoral muscles. The rotation into the side plank develops shoulder stabiliser strength and your entire core musculature, in particular your internal and external obliques. If you are already strong then this move will develop endurance in the upper body which is great for boxing and for maintaining a capable, effective body. If you are starting this workout and you are weak, you will develop raw strength doing this move, however, your body is simply not heavy enough to add any bulk.
Beauty Benefits: Where there is strength there is tone! This move will directly help you get and maintain a lean and athletic upper body.
Starting Position: Press up position with the head in line with the back and the wrists below shoulders. Try to maintain a braced core (tense up your abs by 30% of maximum effort and try to ‘switch’ on your latissimus dorsi).
Technique: As per the GIF, alternate sides and keep the movement fluid. Always try and make the move look easy and keep to a steady tempo with control, as this will require your core to work harder. For the press up phase, focus on your elbows moving wide whilst you maintain your structure. When you rotate, float your hand up in the air. Be graceful and don’t rush. Really channel the beauty within this movement.
Pro Tip: Breathing out slowly through your mouth as you push away from the floor and rotate up will help to regulate your breathing, making it feel easier psychologically.
Professional: 3 sets of 60 seconds
Expert: 1 set of 50 reps
Master: 2 sets of 50 reps
Inter-set rest: 30 seconds
Easier: Do the press up and rotation on your knees.
Harder: Put your hands close together, often referred to as a diamond press up (as your hands will create a diamond shape on the floor). This modification will switch off the outer side of your pecs, so the triceps will be forced to work and develop much more. For added laughs, it also makes it harder to a balance, so rotating into your side plank will be more challenging.
REST 45 SECONDS
One Handed Burpees
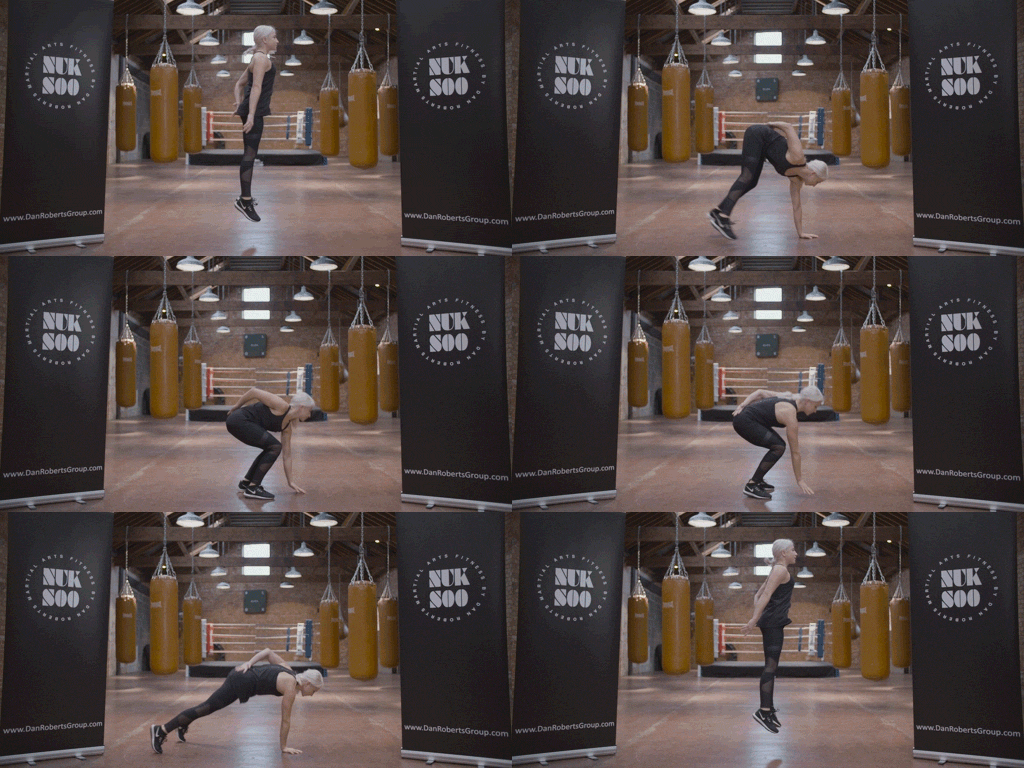
Warrior Benefits: Abs, core and cardiovascular output will all improve, and you will develop your lower body power and general endurance. The shoulder and glutes will also get a smaller workout, but by the time you do this move, they (along with all your other muscles) will be fatigued from the other exercises, so this will very much be a total body workout. This is a hard drill, and I know you are tired but stick with it, this is where exercising can become character building. Just like a muscle, when you dig deep and push on through, your mental toughness will improve every time you test it. This is a key concept of this warrior challenge, so I am expecting a big effort from you today.
Beauty Benefits: This is great for fat loss and the toning of your abs. You will also tone the arms and glutes a little bit too.
Starting Position: Begin in a half squat position with your left palm touching the floor and your right hand behind your back.
Technique: Jump your feet backwards so your are in a press up position, then jump forwards so your feet land back in the same position and then jump in the air. As you jump swap your hands around so your left hand is behind your back and your right hand is by your side ready to support you as you land. When you land, bend your knees and repeat the exercise with the opposing hand. Keep on alternating sides and try and get into rhythm just like the GIF.
Pro Tip: To maximise your cardio benefits don’t be lazy on your jumps. Really kick back when horizontal to get into that plank and when doing the vertical jump, go for as much height as you can. The more you push the bigger the sense of accomplishment you achieve.
Professional: 3 sets of 10 reps
Expert: 3 sets of 20 reps
Master: 3 sets of 30 reps
Inter-set rest: 30 seconds
Easier: Loose the jump and stand.
Harder: Hold the one-handed press up position for 3 seconds on every rep.
REST 45 SECONDS
A-Frame Walks
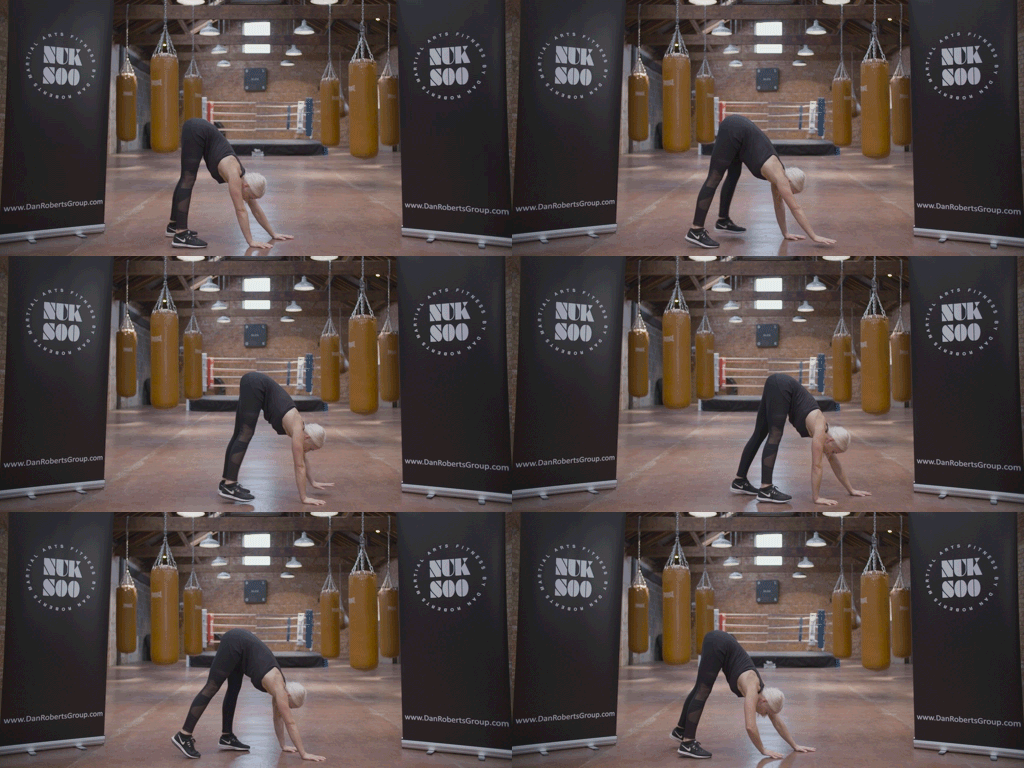
Warrior Benefits: A-Frame walks (so-called as you look like a big letter A), are commonly used as a drill in gymnastics to improve flexibility. Tendons in your calves and hamstrings along with your lower back will all get a fantastic workout. The more flexibility you have in your lower body, lessens the chance of injury. Flexible hamstrings also mean you’ll be able to kick with height and power – an important part of your warrior training.
Starting Position: Stand up straight and bend over from the hips and touch the floor with your fingers. Walk your hands out until they are flat on the floor. Your feet should be flat as well. Your hips should be up in the air with your arms and legs completely straight.
Technique: Once in position and maintaining straight limbs, take a small step forward with the left hand and right foot. Now keep moving forward two steps and then walk back two steps. Keep going forward and back throughout the timed set.
Pro Tip: Be mindful to keep your heels down as they will want to come up off the floor. Doing an exercise mindfully – means being 100% aware. Therefore, do it slowly and focus all your attention on what you are doing here and now. Stretching can hurt, but don’t shy away from this – acknowledge how it feels and stay in the present. Clarity and control come from being fully aware – true warriors don’t shy away from internal pain.
Professional: 2 sets of 60 seconds
Master: 2 sets of 2 minutes
Expert: 3 sets of 2 minutes
Inter-set rest: 30 seconds
Easier: Don’t walk, just hold the stretch position.
Harder: Put your feet closer to your hands as you walk.
REST 45 SECONDS
Alternating Thigh Teeps
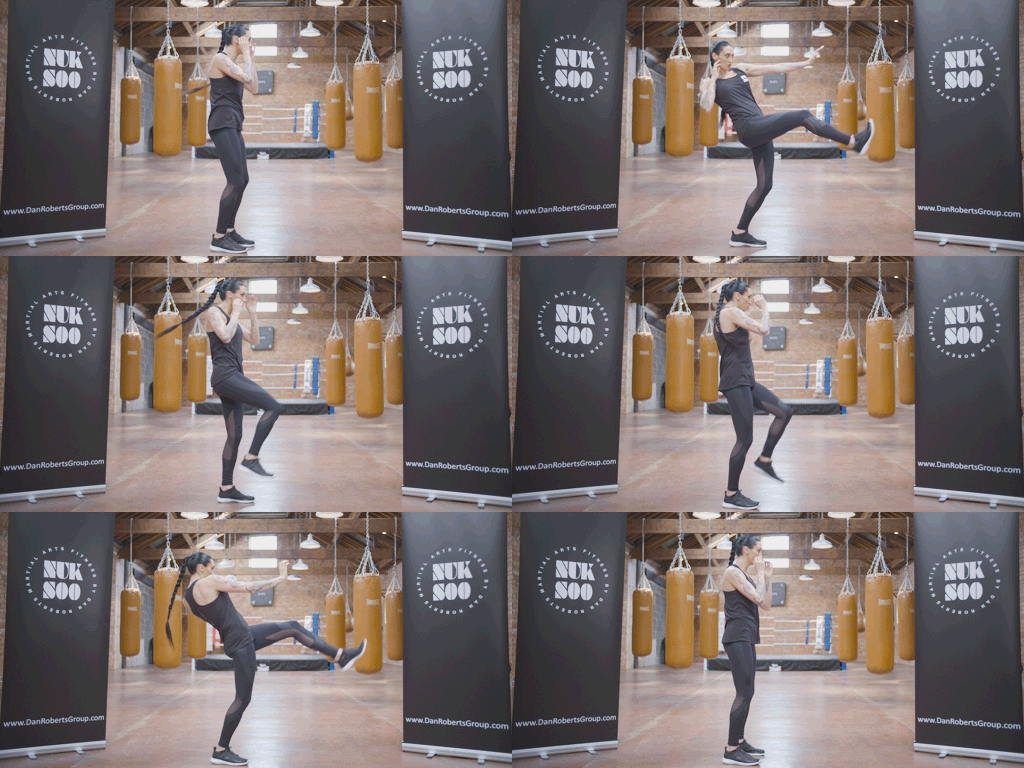
Warrior Benefits: This move develops power, endurance and co-ordination in your lower body as well as improving posterior chain and core function. It is traditionally used to push an opponent away, the video below explains how it can be used in a combat situation, as a self-defence or attack move.
Beauty Benefits: This drill will tone your legs, firm your glutes and help you burn fat throughout your entire body.
Starting Position: Stand up straight with your feet shoulder width apart and your hands up in a fighting stance. To move fluidly you must have no tension in body or mind, so make sure your shoulders and legs are relaxed.
Technique: Lift your left knee up and extend your leg forward at thigh height in a pushing motion in front of you. Lean your upper body backwards which will feel a bit like a pendulum. As you extend your left leg forward to strike, extend your right arm at the same time. Breathe out through your nose as you strike. Once you have done the strike with the left leg, step back into the start position and repeat on the right leg. Keep on alternating sides.
Pro Tip: As you strike, lift the heal on the back foot an inch off the floor. This allows your back knee to travel forward over your ankle and gives you more hip thrust and power.
Professional: 2 sets of 30 reps
Expert: 2 sets of 40 reps
Master: 3 set of 50 reps
Inter-set rest: 30 to 60 seconds
Please do the warrior challenge exercises as explained above. However, as a reminder, if you want to modify the moves due to injury, here are some ideas.
Easier: Slow down the tempo by 50% and really focus on your form.
Harder: Add in a squat thrust after every 4th rep. I’ve done this drill with MMA athletes. It’s hard, but very effective for conditioning the heart. Try it after you’ve finished today’s workout!
REST 45 SECONDS
Kempo Floor Kicks
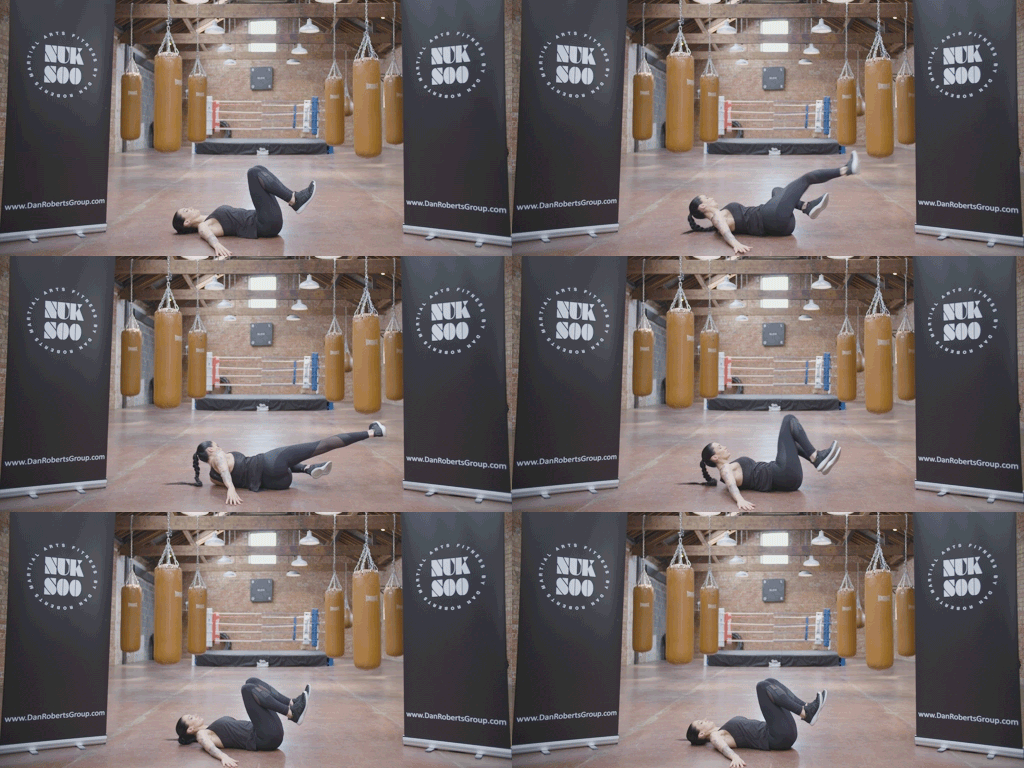
Warrior Benefits: You will develop your hip-gluteal musculature, core and improve lower body muscle firing speed. You will also learn a way of striking when in very weak position.
Beauty Benefits: This move will mildly tone your lower body. The glutes and hamstrings will get visibly firmer in particular.
Starting Position: Lie on your back, with your feet off the floor and your knees above your hips. Stretch your arms out to the side to give you balance and point your toes up.
Technique: Shift your weight and rotate your body to the left, so your right side and shoulder are off the floor, extend and strike the right foot and drive your heal forwards finishing with your foot about 12 inches above the floor. As you twist, make sure you are engaging your core. Come back to the start position and repeat on the other side. Then keep on alternating sides. Breathe out through your mouth as you strike and breathe in through your nose as you recoil the leg.
Pro Tip: It’s normal for your head to pop up as you strike, as you would be looking at your opponent, so get into the habit of looking at exactly where you want to strike. Imagine a tennis ball is there and you are aiming to to kick it away. This will help with precision – a precise strike is twice as effective, as a harder hit with no accuracy.
Professional: 1 set of 40 reps
Expert: 1 set of 60 reps
Master: 1 set of 100 reps
Easier: To remove the twisting action, keep your back on the floor and rest your head on a pillow.
Harder: Quickly stand up after after every 3 reps.
REST 45 SECONDS
Alternating Front Elbows
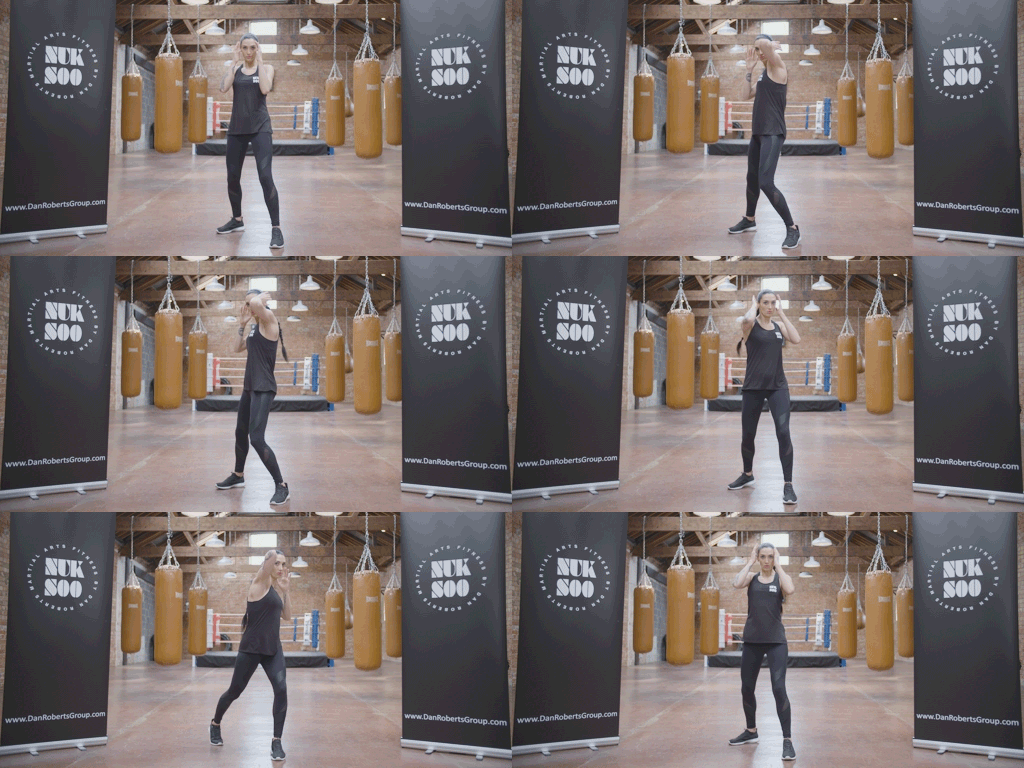
Warrior Benefits: This is an advanced Muay Thai striking move that traditionally serves to open up your opponent’s guard. Martial art moves need to be practiced 1000s of times to become second nature and useful in a fight scenario. I never want you to hit anyone though! We can learn so much from all martial arts and one of the aims of NUK SOO™ (the full 90-day program that inspired this challenge) is to take you on warrior journey to be capable and learn to challenge and control your body and emotions. We can get fit and have fun building a new set off skills that I hope you will never need to use on someone. For general MMA, street fighting and self-defence applications, please see the video.
Beauty Benefits: A mild fat burning effect. This increases when doing the harder modification.
Starting Position: Stand in a relaxed split stance with the left foot forward and the right foot back, hip width apart with your hands up protecting your jaw. If you are left handed which is called ‘southpaw’, then you may flip this stance.
Technique: Strike with your leading side by swinging the elbow up bringing your hand by your ear. As you do this, extend your hips and shoulder forward to the imaginary target. Your left heal will twist out as you strike. Come back to your start position, maintain stance and then do the other side and keep on alternating. This exercise is timed, so don’t worry about counting and focus on your technique. Your aim as take no rests until the time runs out.
Pro Tip: Power comes from good foot work. For example, if you are striking on the left, lift up your left heal and screw the ball of the foot into the floor as you strike. This will allow for more ankle and hip movement and will make the strike faster, more powerful and professional.
Professional: 1 set of 90 seconds
Master: 1 set of 2 minutes
Expert: 1 set of 3 minutes
Easier: Do it at half the speed of the GIF.
Harder: Make it more of a cardio conditioning workout and add in one quick and deep squat between each and every rep.
REST 45 SECONDS
Capoeira Kicks
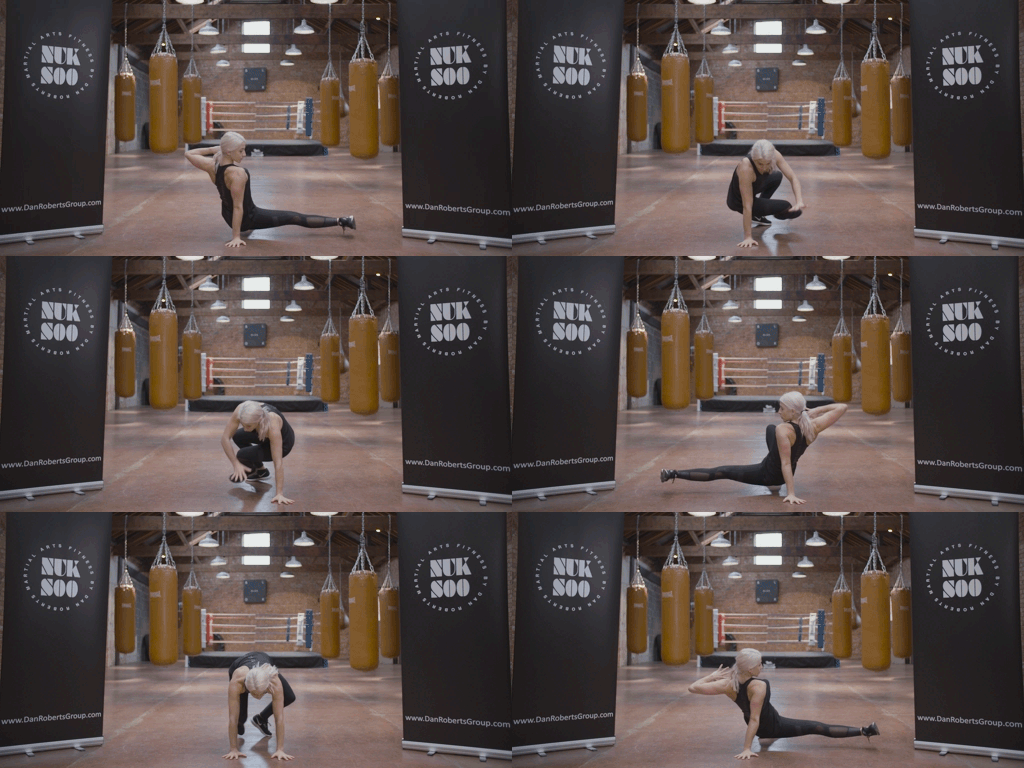
Warrior Benefits: Remeber these? As you know, It’s is a fantastic exercise for core development, shoulder stabiliser strength and hip mobility. As it’s a pretty advanced move, it will also test and develop your gross motor skills and improve co-ordination. You will be doing lots of reps of this bad boy so your cardiovascular system will get a wake up too! Also, for self–defense, this is an effective way of striking an opponent in the ankle if you have been knocked to the floor.
Beauty Benefits: Fat loss and it will tone up your glutes, abs and obliques. Check out teh fight application video and you will Jen doing a set of really quick ones which are even better for fitness and athletic development.
Starting Position: Get on all fours with your hands shoulder width apart and your knees bent so they are directly below your hips. Have a flat back and a relaxed neck.
Technique: This is quite complex to do fluidly, so watch the GIF and video application and read the copy below. Aim to increase fluidity once you have all the components dialed into your muscle memory.
Stage 1 – Lift your left foot off the floor and begin to rotate the right foot by 180º so your heal is facing towards you. Do this whilst lifting your right arm off the floor and into the air.
Stage 2 – Relax your right quad muscle so your hip drops down close to your ankles and then extend the hip and leg out at 90º. It shouldn’t touch the floor but it should stay parallel to it, lifted a couple of inches at all times.
Stage 3 – Return to the start position and place your hand back on the floor and then repeat on the other side.
Pro Tip: The back foot rotating is the key to mastering this move. This move will only look and feel great once all the elements are solid and the body is moving as one complete unit. When learning, it’s sometimes useful to do the elements totally incorrect on purpose to highlight the importance of the technique.
Professional: 4 sets of 10 reps
Expert: 4 sets of 20 reps
Master: 3 set of 40 reps
Inter-set rest: 30 seconds
Easier: Eliminate the kick at the end after you twist.
Harder: Add a 4 step Ninja Crawl after each rep. This is best done when you have space.
REST 45 SECONDS
Scissor Kicks
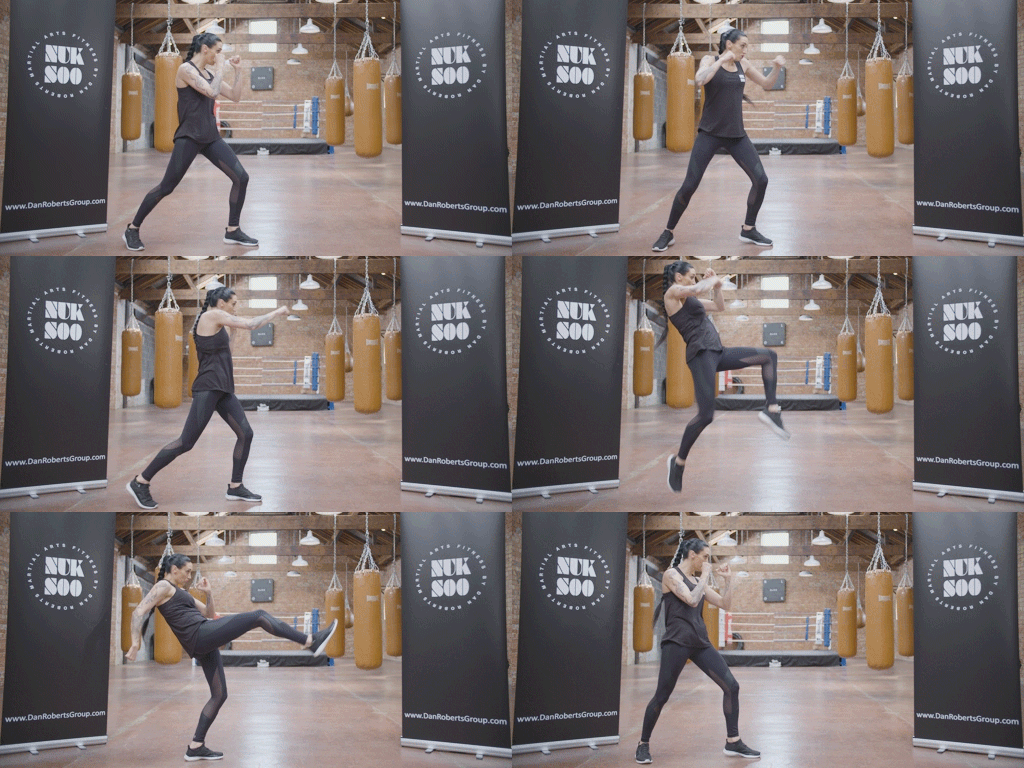
Warrior Benefits: Aside from doing a fun karate style kick, this combination move will test and improve your co-ordination and balance, strengthen your core and develop hamstring flexibility.
Beauty Benefits: Fat burning and leg toning effect.
Starting Position: Standing up in boxing stance with the left foot forward and the right foot back.
Technique: This is a small fight sequence made up of four moves. You left jab, right cross, then lift the left knee in the air – hop up and then drive the right knee up and extend the right foot forward. Its a snappy kicking action that’s perfectly demonstrated by Dee in the GIF. On the next rep, have your right knee up and kick with the left. Keep on alternating feet but stick to left jab and right cross.
Pro Tip: Do a shallow exhale on each strike and do a bigger exhale when you do the kick. In many martial art disciplines, a shout or noise is made with the strike to help focus the mind and intimidate the opponent. To get you into the mood, as you kick, say Uchi (pronounced ‘oo-chee’) which is what is often taught in Karate dojos. This means to ‘strike’ and it’s very easy to say while exhaling.
Professional: 3 sets of 60 seconds
Expert: 3 sets of 90 seconds
Master: 3 sets of 2 minutes
Inter-set rest: 60-90 seconds
Easier: Take out the punches and just focus on the scissor kick element.
Harder: Kick higher.
REST 30 SECONDS
Cool Down
Just follow along and enjoy the opportunity to stretch off your muscles. They worked hard today, so deserve a little bit of TLC. Trigger point therapy, massage, and having a hot bath in magnesium salts are also great ways to help your body recover.
Well done, Please let me know how you are getting on!.. If you follow me on my Instagram @teamdanroberts just message me, otherwise, contact me here.

